If you are ever in need of a Druid cluster deployment on your laptop, here’s how to do it. This is a quick guide to deploy Apache Druid ® using k8s minikube and min.io on your laptop. Why not use standalone or docker-compose versions instead, you ask? Good point, for the most part it is probably easier to do that. But if you are learning Apache Druid® and at some point you’ll want to scale out on some Kubernetes service in the cloud or on-premises, then it is good to understand how to deploy and manage in a Kubernetes context. This blog post is a starting point that lets you work with Kubernetes but without any cloud fees or extra hardware needed. These instructions are for MacOS with at least 6 CPUs and 8.5GB of memory to spare.
Helm Chart
We use the Apache Druid Helm Chart to deploy and manage the Druid database on Kubernetes. Our intent is to get you from zero to running Druid in just a few minutes and without any prior knowledge. These instructions will help you deploy Apache Druid as a distributed cluster on minikube adding min.io on k8s that uses local disk for deep storage. In the end, you have a deployment that does not require access to the internet.
Throughout this post, the kubernetes namespace is set to “dev”, you can change it to whatever you want as long as you change it everywhere. For all such parameters, we’ve color coded them like this, to indicate they are changeable.
So without further ado, the step by step instructions:
Install a VM Manager
Minikube can use different VM management engines like docker and hyperkit. In this test we used hyperkit.
brew install hyperkit
Install Minikube, Kubectl and Helm and start minikube
Step 1– You’ll need homebrew to do this step. If you don’t already have it installed, you can find how to do that here.
Step 2 – Open a terminal window and run:
brew install minikube
brew install kubectl
brew install helm
Step 3 – Create the minikube cluster with the following commands from the same terminal window. We’ll need enough memory and CPUs:
This will take some time and the output should look like this:
😄  minikube v1.23.2 on Darwin 11.3.1
✨  Automatically selected the hyperkit driver
👍  Starting control plane node minikube in cluster minikube
🔥  Creating hyperkit VM (CPUs=6, Memory=8192MB, Disk=20000MB) ...
🐳  Preparing Kubernetes v1.22.2 on Docker 20.10.8 ...
    ▪ Generating certificates and keys ...
    ▪ Booting up control plane ...
    ▪ Configuring RBAC rules ...
🔎  Verifying Kubernetes components...
    ▪ Using image gcr.io/k8s-minikube/storage-provisioner:v5
🌟  Enabled addons: storage-provisioner, default-storageclass
🏄  Done! kubectl is now configured to use "minikube" cluster and "default" namespace by default
Deploy min.io on Minikube
Step 1 – Open another terminal for min.io setup.
Step 2 – Add the min.io chart repository for helm:
helm install -n dev --create-namespace -f minio_values.yamlminiominio/minio
NAME: minio
LAST DEPLOYED: Fri Feb 18 15:04:35 2022
NAMESPACE: dev
STATUS: deployed
REVISION: 1
TEST SUITE: None
NOTES:
MinIO can be accessed via port 9000…
...
Step 5 – Setup port forwarding from localhost into the min.io console service:
export POD_NAME=$(kubectl get pods --namespace dev -l "release=minio" -o jsonpath="{.items[0].metadata.name}")
kubectl port-forward $POD_NAME 9001 --namespace dev
Forwarding from 127.0.0.1:9001 -> 9001
Forwarding from [::1]:9001 -> 9001
This kubectl command will run as a foreground process, the terminal will continue to display port forwarding activity for as long as you need access to the Min.io UI.
Step 6 – Configure Deep Storage bucket – On a web browser go to http://localhost:9001
Logon with credentials rootUser, rootpass123
In Buckets, Create a bucket “druidlocal” with default settings.
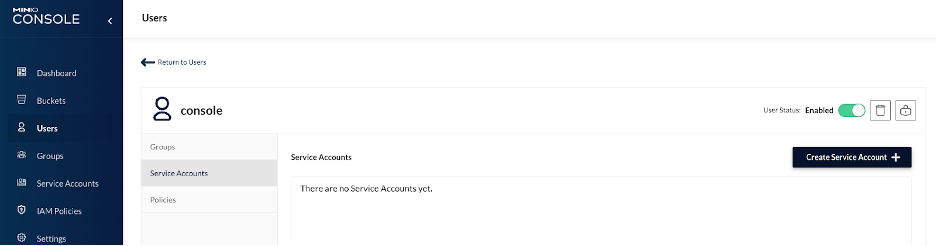
Step 7 – In Users, select the console user, then:
Add a service account, use Custom Credentials to specify access key=access123, and secret key=secret1234567890 which simplifies the copy/pasting later in this doc.
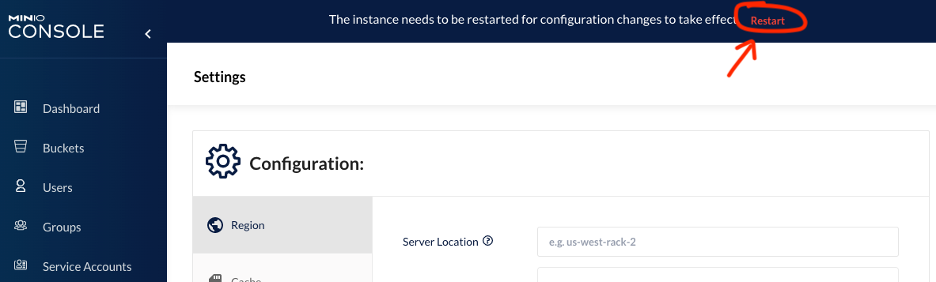
In Settings / Region, set Server location to “us-west-1“, and click Save.
Step 8 – Restart the min.io service using the UI.
Deploy Apache Druid on Minikube
Now that we have an S3 API compatible storage manager running in the kubernetes cluster, we can deploy Apache Druid. All other dependencies of Druid are already a part of the project’s helm chart. So let’s start another terminal window and execute the following:
Step 2 – Retrieve chart dependencies for zookeeper and postgresSQL:
helm dependency update helm/druid
Getting updates for unmanaged Helm repositories...
...Successfully got an update from the "https://charts.helm.sh/incubator" chart repository
...Successfully got an update from the "https://charts.helm.sh/stable" chart repository
...Successfully got an update from the "https://charts.helm.sh/stable" chart repository
Hang tight while we grab the latest from your chart repositories...
...Successfully got an update from the "minio" chart repository
Update Complete. ⎈Happy Helming!⎈
Saving 3 charts
Downloading zookeeper from repo https://charts.helm.sh/incubator
Downloading mysql from repo https://charts.helm.sh/stable
Downloading postgresql from repo https://charts.helm.sh/stable
Deleting outdated charts
Step 3 – Create the parameter overrides needed to deploy locally by creating a file called k8s_minikube.yaml with the following content :
One other useful property is the druid image version that’s being deployed. Add this section to the yaml file to change it to any version you need to work with:
image:
  tag: 0.22.1
Step 4 – Deploy the Druid cluster:
helm install druid helm/druid --namespace dev -f k8s_minikube.yaml
W0218 15:36:46.492231   25538 warnings.go:70] policy/v1beta1 PodDisruptionBudget is deprecated in v1.21+, unavailable in v1.25+; use policy/v1 PodDisruptionBudget
W0218 15:36:46.754347   25538 warnings.go:70] policy/v1beta1 PodDisruptionBudget is deprecated in v1.21+, unavailable in v1.25+; use policy/v1 PodDisruptionBudget
NAME: druid
LAST DEPLOYED: Fri Feb 18 15:36:46 2022
NAMESPACE: dev
STATUS: deployed
REVISION: 1
TEST SUITE: None
NOTES:  the notes include port forwarding instructions, but we are using a slightly different parsing to find the router pod (see below)
Step 5 – We’ll need to redirect port 8888 from localhost into the cluster’s router service which provides the Apache Druid UI:
export PODNAME=$(kubectl get po -n dev | grep router | cut -d" " -f1)
kubectl port-forward pod/$PODNAME 8888 -n dev
Step 6 – You may need to wait a bit until all pods are ready. Some may restart as they timeout waiting for dependencies to get started, but they will ultimately all end up in READY 1/1 state. You can monitor the startup with the following command:
Notice that middle managers and historicals are deployed as stateful sets and therefore have a predetermined naming convention while router, broker, coordinator are all using ephemeral names. If you feel adventurous and want to see what’s inside, you can open a shell into any of the pods using:
kubectl exec -it <podname> -n dev -- /bin/sh
Logs
You can retrieve the logs of any of the pods with:
kubectl logs <podname> -n dev
Add a -f to tail the log indefinitely, very useful when debugging!
Minikube Cluster Operations
minikube stop – stops the whole kubernetes cluster, use this if you want to be able to use the same deployments later. Any loaded data will still be available at restart.
minikube start– restarts the cluster and brings back any install deployments (minio and druid).
minikube delete– this is destructive, it will wipe out everything including the kubernetes cluster, restarting will require a new set of helm install commands to redeploy.
If you want to have a Druid cluster handy but without using resources while you aren’t using it, you can use minikube stop to pause and minikube start to resume. You will need to restart the port-forwarding commands to gain access to the corresponding UIs after restart completes.
Chart Operations
To remove a deployment you can use helm uninstall:
If you want to make changes to the configuration, update the yaml file and apply the changes live with:
helm upgrade druid helm/druid --namespace dev -f k8s_minikube.yaml
helm upgrade minio minio/minio --namespace dev -f minio_values.yaml
What’s Next…
We’re planning a series of Druid on Kubernetes related blog posts. Coming soon, we’ll delve into how to use the helm chart to deploy to the cloud using more CPU, memory and storage. Also feel free to reach out with comments or suggestions at sergio.ferragut@imply.io.
Other blogs you might find interesting
No records found...
Jun 16, 2025
10 Years of Imply: From Apache Druid to What’s Next in Real-Time Analytics
We’ve officially hit double digits! Ten years ago, a few Druid-obsessed engineers asked a radical question: What if analytics didn’t have to be slow, stale, or stuck in dashboards? Back then, we were just...
Real-Time Observability Without Operational Overhead: What’s Next?
Observability is meant to provide clarity, speed, and confidence in modern systems. Yet for many organizations, it has become a source of complexity, cost, and operational drag. Managing pipelines, tuning...
It’s Time to Rethink Observability: The Event-Driven Future
Observability has evolved. Forward-looking teams are already moving beyond static dashboards and fragmented telemetry—treating all observability data as events and unlocking real-time insights across their...