In recent years, the world of data analytics has seen a significant shift towards cloud-based data warehousing solutions. Snowflake has emerged as a popular choice among developers for its ease of use and scalability. However, as data volumes continue to grow, many developers are finding that Snowflake’s performance may not be sufficient for their needs. In this blog, we will walk through how to migrate data from Snowflake to Apache Druid. Including the code required to connect to Snowflake, download the data, and ingest that data into Druid.
Druid is designed specifically for high-performance analytical queries. Druid stores data in a columnar format, similar to Snowflake, but it uses an indexing engine to speed up query performance. The through indexing allows Druid to quickly filter and aggregate data at the segment level. This means that Druid can retrieve only the relevant data for a given query, rather than retrieving the entire dataset. This approach significantly reduces the amount of I/O required to retrieve data from disk, resulting in faster query performance. Druid is also purpose-built to handle real-time stream ingestion from sources like Kakfa and Kenisis, making it an excellent choice for applications that require real-time analytics.
The Data Migration Process
To execute the steps outlined in this blog, you will need the following prerequisites:
- Apache Druid installed
- Account on Snowflake Cloud
Extracting Data from Snowflake
This Python script below extracts data from a Snowflake database and subsequently saves it in CSV format. The program begins by loading configuration details from a `database_configs.json` file using the `load_config` function. After reading the configuration, it connects to the Snowflake database with the `connect_to_snowflake` function, using the provided credentials and database details. Once connected, the script executes a SQL query to retrieve all records from the `TBL_CUSTOMERS` table using the `execute_query` function. The results are then saved to a CSV file via the `save_results_to_csv` function. If any issues occur during the execution, appropriate error messages are displayed. Once the data retrieval and storage process concludes, the script invokes the `create_ingest_spec` function from the `snowflake_ingest` module to upload the data to Druid. That code is provided later in the blog.
import csv
import snowflake.connector
import json
from snowflake_ingest import create_ingest_spec

CONFIG_PATH = '/Users/rick/IdeaProjects/CodeProjects/druid_data_integrations/database_configs.json'


def load_config(file_path=CONFIG_PATH):
	"""Load configuration from a JSON file."""
	with open(file_path, 'r') as file:
    	return json.load(file)


def connect_to_snowflake(config):
	"""Connect to Snowflake using provided configuration."""
	return snowflake.connector.connect(
    	user=config['snowflake'].get('user'),
    	password=config['snowflake'].get('password'),
    	account=config['snowflake'].get('account'),
    	database=config['snowflake'].get('database')
	)


def execute_query(conn, query):
	"""Execute a SQL query using an active Snowflake connection."""
	with conn.cursor() as cur:
    	cur.execute(query)
    	return cur.fetchall(), cur.description


def save_results_to_csv(data, description, output_file="data/snowflake_data.csv"):
	"""Save the result set to a CSV file."""
	with open(output_file, 'w', newline='') as file:
    	writer = csv.writer(file)
    	writer.writerow([desc[0] for desc in description])
    	writer.writerows(data)


def get_data():
	try:
    	config = load_config()
    	with connect_to_snowflake(config) as conn:
        	data, description = execute_query(conn, 'SELECT * from TBL_CUSTOMERS')
        	save_results_to_csv(data, description)

    	print("Snowflake connection and query successful.")

	except Exception as e:
    	print(f"An error occurred: {e}")


if __name__ == "__main__":
	get_data()
	create_ingest_spec()
Note that the load_config function uses a config file to store Snowflake connection data.
Below is an example of the `database_configs.json` that stores the database configuration details that are used in the script above.
{
  "snowflake": {
	"user": "rjsample",
	"password": "xxxxxxxxx",
	"account": "xxxxxxx.us-east-1",
	"database": "DEMO_SAMPLE_DATA"
  }
}
Loading Data into Druid
Once you’ve extracted the data from Snowflake, the next step is to load it into Druid. For this batch upload process, the script below creates an ingestion specification for Druid. The `construct_ingestion_spec` function had two primary parameters: the data source’s name and the directory where the data resides, in a CSV format. The script sends the specification to a Druid host using the `post_ingest_spec_to_druid` function. This function dispatches the ingestion specification via an HTTP POST request, uisng the `requests` library. During this transmission, any errors, are captured and displayed to the user. For convenience, the script uses default values for the data source, directory, and Druid host which can be overridden with passed in parameters to the `create_ingest_spec` function.
import json
import requests

def construct_ingestion_spec(DATA_SOURCE, BASE_DIR):
	# Construct Ingestion Spec in JSON format
	return {
    	"type": "index_parallel",
    	"spec": {
        	"ioConfig": {
            	"type": "index_parallel",
            	"inputSource": {
                	"type": "local",
                	"baseDir": BASE_DIR,
                	"filter": f"{DATA_SOURCE}.csv"
            	},
            	"inputFormat": {
                	"type": "csv",
                	"findColumnsFromHeader": True
            	}
        	},
        	"tuningConfig": {
            	"type": "index_parallel",
            	"partitionsSpec": {
                	"type": "dynamic"
            	}
        	},
        	"dataSchema": {
            	"dataSource": DATA_SOURCE,
            	"timestampSpec": {
                	"column": "CREATED_AT",
                	"format": "auto"
            	},
            	"dimensionsSpec": {
                	"useSchemaDiscovery": True,
                	"dimensionExclusions": []
            	},
            	"granularitySpec": {
                	"queryGranularity": "none",
                	"rollup": False,
                	"segmentGranularity": "hour"
            	}
        	}
    	}
	}


def post_ingest_spec_to_druid(spec, DRUID_HOST):
	"""Post the ingestion spec to Druid and return the response."""
	headers = {'Content-Type': 'application/json'}
	response = requests.post(DRUID_HOST, json.dumps(spec), headers=headers)
	return response


def create_ingest_spec(DATA_SOURCE='snowflake_data',
                   	BASE_DIR='/Users/rick/IdeaProjects/CodeProjects/druid_data_integrations/data',
                   	DRUID_HOST='http://localhost:8081/druid/indexer/v1/task'):
	spec = construct_ingestion_spec(DATA_SOURCE, BASE_DIR)
	print(f'Creating .csv ingestion spec for {DATA_SOURCE}')

	try:
    	response = post_ingest_spec_to_druid(spec, DRUID_HOST)
    	response.raise_for_status()
    	print(response.text)
	except requests.HTTPError:
    	print(f"HTTP error occurred: {response.text}")
	except Exception as e:
    	print(f"An error occurred: {e}")


if __name__ == "__main__":
	create_ingest_spec()
After the initial batch data ingest, updates from Snowflake can be handled by a simple change data capture (CDC) process using a LAST_UPDATED date time field to determine the updated or new records, along with data load code to add the new/updated fields or by using various ELT tools. For example:
- Snowflake Streams: Snowflake has a feature called “Streams” that allows you to capture changes made to a table. Using Snowflake Streams, you can identify changed data and then use an ETL tool or custom script to send those changes to Druid.
- ETL Tools: Tools like Apache NiFi, Talend, or StreamSets can be used to create workflows that capture, transform, and load changes from Snowflake to Druid.
- Custom Scripts: Depending on the complexity and volume of your changes, you might opt to write custom scripts that regularly poll Snowflake for changes and then push those changes to Druid.
- Third-party Solutions: There are third-party solutions and managed services that offer CDC capabilities and could be configured to work between Snowflake and Druid. It’s worth exploring these if you’re looking for a more managed solution.
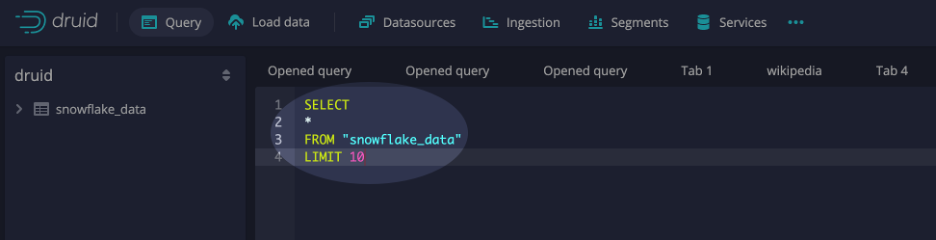
Sample Query
To verify that the data was ingested, select the query interface from within the Druid console and execute SQL similar to the example below:
Summary
By migrating analytical data to Druid, organizations can enhance their data warehousing capabilities and tap into its real-time analytics power. Druid opens up a whole new set of use cases by offering improved performance and scalability. Following a step-by-step migration process such as the one outlined in this blog and implementing best practices like data denormalization can greatly simplify the migration process. So if you are looking to unlock the full potential of your analytics, consider moving datasets to Apache Druid.
About the Author
Rick Jacobs is a Senior Technical Product Marketing Manager at Imply. His varied background includes experience at IBM, Cloudera, and Couchbase. He has over 20 years of technology experience garnered from serving in development, consulting, data science, sales engineering, and other roles. He holds several academic degrees including an MS in Computational Science from George Mason University. When not working on technology, Rick is trying to learn Spanish and pursuing his dream of becoming a beach bum.
 Architecture
 Deployment
 Ingestion
 Modeling
 Operations
 Development


